

Even top travel bloggers struggle with SEO. Optimizing your website to rank on Google and other search engines is an ongoing battle as competition is fierce in the online travel blogging space and Google is constantly updating their algorithm.
The fundamental truth of SEO is that cream rises to the top. And that's why some travel bloggers rank so well despite not having an advanced understanding of search engine optimization – they simply put out great content. Even the most advanced SEO tricks of the trade won't keep you in 1st place forever if your content isn't good and visitors leave quickly after arriving to your posts.
My rule of thumb for Travel is Life is that whatever subject I tackle, my first priority is to make the post better than anything else available on that subject. So I research a topic to see what else is out there and how I can be different / better than the existing resources – and only if I feel that I can put out the best and most comprehensive resource about that topic do I move forward with researching keywords.
I preface the SEO strategies I'm about to share with you with that rule of thumb above to let you know what to expect if your content is short and mediocre. The strategies outlined below are intended to help your amazing content rank for additional search queries and reach a larger audience. They won't work very well to manipulate Google or cheat crappy content to the top of search engines. (Although be my guest if you want to try. The principles behind the strategies are the same regardless.)
Sitewide Search Engine Optimization For Travel Blogs
Before I show you strategies for individual posts, I want to make sure that you've covered the SEO basics in regards to your entire website. This includes:
#1) Proper permalink structure for your WordPress travel blog
Your permalink structure controls what comes after the “.com” or “.org” in your URL for each individual post. For most blogs my recommendation is to use the “post name” option in WordPress under Settings –> Permalinks.
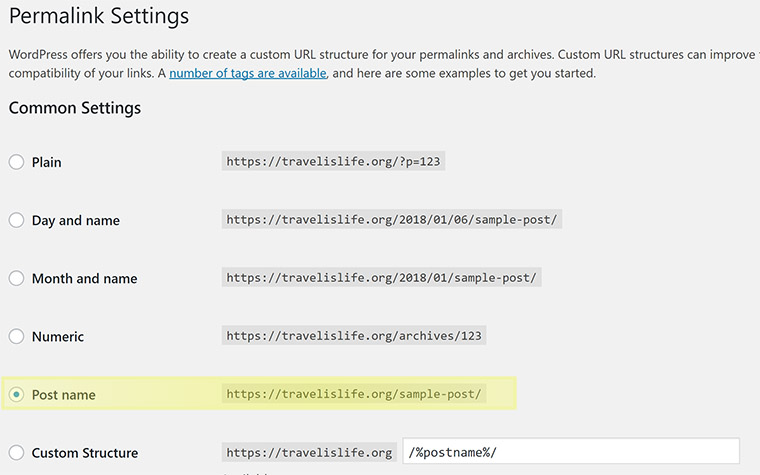
I like clean and short URLs because they're easy for Google and my visitors to read. Removing elements like the date from the URL also gives me the freedom to update the articles in the future and keep them current. For example, I can update and resyndicate the same content in the future and readers won't see “2015” in the URL, which would make the post look old even though it's been updated. I also don't like including the category in my URLs because many of my posts are categorized in multiple categories, and I like the freedom of being able to add/edit/remove categories in the future without breaking my URLs. And that's why my recommended permalink structure is to use the “post name” option.
WHATEVER YOU DO – definitely change it from the default “plain” setting because otherwise you're missing out on having descriptive URLs that include search terms. I also feel that it adds confidence for visitors to click on your link when they see a descriptive URL.
Which would you rather click on?
Option #1) https://travelislife.org/?p=2247
Option #2) https://travelislife.org/pinterest-marketing-for-travel-bloggers/
Give them a try and you'll see that they both lead to the same place, but option #2 gives the visitor an idea of what page they're about to visit first.
One thing to note is that if your current permalink structure is set to “plain” and you change it to “post name” – all of your old links will still work. The “plain” setting references the post number in your database and will still continue to work in the future. Or in my case, I've had my URL structure set to “post name” since day one, and referencing the post number in the database still works regardless and always will.
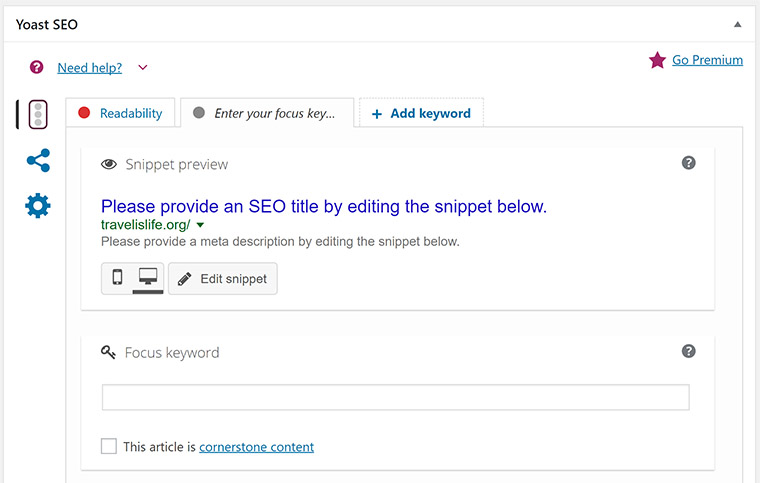
#2) Hosting your meta data in a plugin including Meta Title, Description, etc.
My general rule of thumb regarding where to host your meta-data is to always host it in a plugin and not a theme. And the reason for that is simple – it gives you the flexibility to change themes in the future while retaining all your meta info. If, for example, your theme shits out on you for some reason and you have to switch to a different theme quickly to bring your site back up, you will retain your meta info and not lose your hard earned search engine placement in the meantime. Switching themes is a complicated process no matter what, so I just prefer removing the element of having to do an SEO transition from the process.
Personally I use Yoast SEO Plugin on this blog, but that's not to say that one SEO plugin is better than another. I have had success using Yoast for a long time on many of my websites, and I appreciate how frequently the developer keeps the plugin updated. (I don't want my SEO plugin to be a security risk so I gravitate towards using plugins that are frequently updated.) I use Yoast, but I'm not necessarily encouraging you to switch if you're already using an SEO plugin that works well for you, because it's less about WHICH plugin you use and more about HOW you use it, which I will get into more later in this post.
#3) Register your travel blog with webmaster services
As I get into specific post strategies later, you'll see exactly why you need to be registered with webmasters. For now let's just say that in order to have a proper idea of how your sitewide SEO is doing, you should be registered with Google Search Console (formerly called Google Webmasters) and Bing Webmaster Tools.
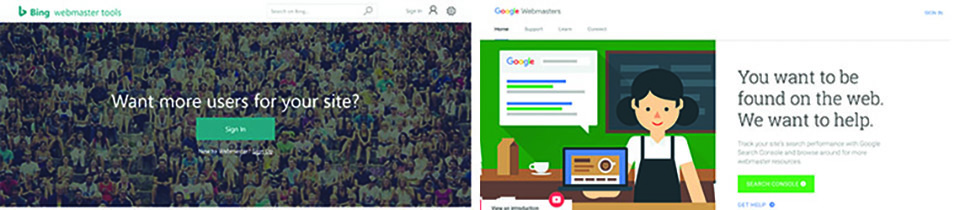
After you register with each service, you'll need to verify that you own the domain. This is usually done by uploading an HTML file to your server or adding a meta tag to the HEAD area of your theme. Next you'll want to submit your sitemap(s) to each webmaster service. If you're unfamiliar with what that is, a sitemap essentially lists every page, post, product, etc., on your website in a format that's easy for Google to read.
Here's my sitemap: https://travelislife.org/sitemap_index.xml.
These files were automatically generated by the Yoast SEO Plugin – and typically most SEO plugins offer that type of functionality as well. After you've generated your sitemap, follow these instructions on how to submit your sitemap to Google and Bing.
The purpose of doing this is so that you don't have to wait on Google and Bing to read and index your website. Instead, you are telling them exactly what information is on your site and where it's located – which expedites the whole process of indexing your content. There are also other perks to having your blog registered with webmaster services such as being notified of errors on your site, monitoring your index status, having the ability to manually crawl your site, etc. – but at minimum, you should register and submit your sitemap just so Google is aware of all your posts.
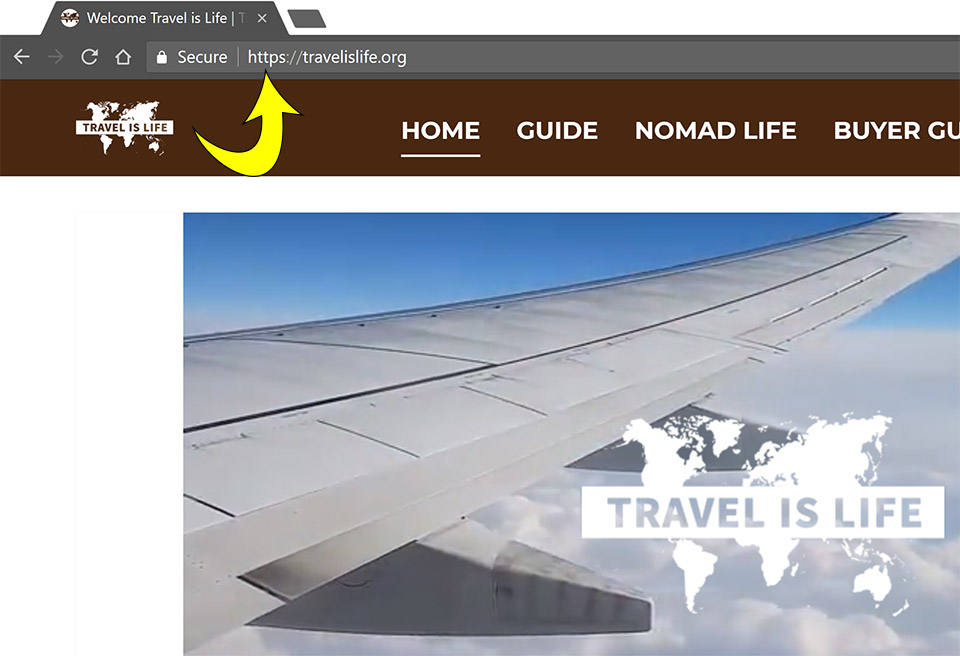
#4) Securing your website via HTTPS with an SSL Certificate
As of last year, Google has officially made HTTPS a factor in determining your search rank. Aside from that reason, it's important to have a secure website for you and your visitors. Google started this trend of moving towards a “secure web” several years ago and gave webmasters plenty of time to make the transition to an HTTPS site. However, as of October 2017, that grace period is over and it's more important than ever for SEO reasons to have an HTTPS website.
UPDATE: Read my post entitled Secure Your Travel Blog w/ HTTPS to learn how to secure your website for free using an SSL Certificate by Let's Encrypt (which is what I do on this blog).
#5) A fast loading travel blog affects your search rank
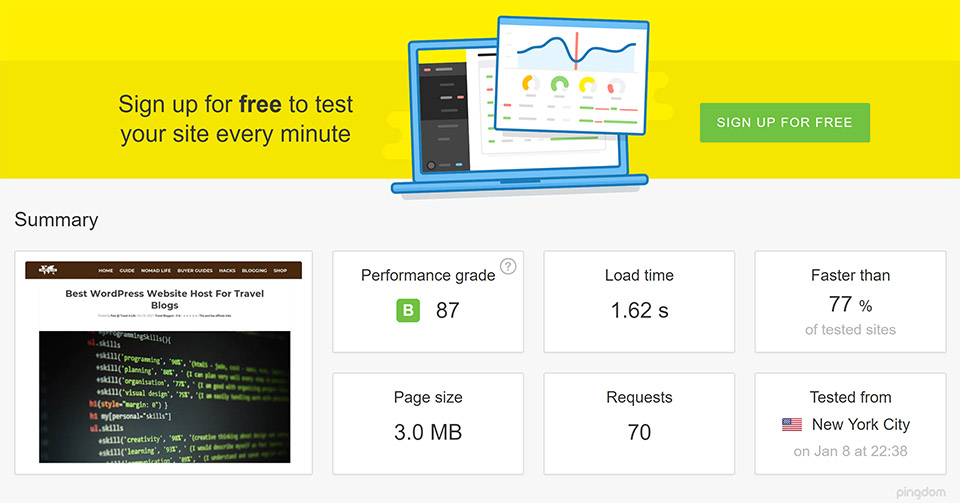
How fast your website loads highly affects your search engine rank. Slow loading pages lead to higher bounce rates (which is the number of people who immediately leave your website after finding it on Google search) and creates a negative user experience – which is fundamentally a big factor in Google's algorithm. This is a topic that needs an entirely separate tutorial on how to accomplish because there are many factors to consider. Check out Pingdom Tools and Google PageSpeed Insights for an idea of how your theme may be affecting your page load speed. You can see an example of a Pingdom Tools speed test below for one of my posts, however keep in mind that the speed of your website is dynamic and changes constantly based on many factors. So you're just looking to do well with speed on average and can't shoot for perfection with each test or visitor page load.
In order to have a fast loading website you need:
- A website host that's suited for the job. SPOILER ALERT: It's not Bluehost. See my recommended Best Website Hosts for Travel Blogs.
- A theme that doesn't unnecessarily weigh your site down by improperly or unnecessarily loading code. Many cheap themes are terrible about loading unnecessary code or improperly loading javascript and CSS files one at a time. And many great themes that aren't customized properly by the user are guilty of the same thing. I use Divi theme but there are a lot of other great themes out there to choose from.
- Compressed images that are optimized for the web. This is the biggest mistake I see many travel bloggers making. They upload uncompressed HUGE versions of their travel photos to their blog. They are usually unaware that they are doing this because the images are DISPLAYED as small on their blog, but in actuality, the site is having to load the huge versions of the images and then scale them down. Right click on an image on your blog and choose “Open image in new tab” and you can see the actual size of the image being loaded. If your travel blog is slow to load images, nine out of ten times, this is the reason why. The solution is to shrink and compress your photos before uploading. Most blogs are displayed in browsers at only 1280 – 1920 pixels wide at most, so there's no reason to load a 4032 x 3024 pixel image. And that's not counting having sidebars which reduce the width of images being displayed even further. As an example, images on my website range from 640 to 960 pixels wide at most depending on if they are being displayed full width or not. Since that's the largest the images will ever be displayed, there's no reason for the actual image files to be any bigger than that.
- A cached version of your website. WordPress is comprised of many different files and databases that function together to output your blog. In a single given blog post, WordPress may be loading 20+ PHP files and 3+ databases to output what the visitor sees in their browser. And unless your blog post is displaying dynamically changing information (like live weather updates, flight prices, stock ticker, etc) there's little reason for the visitor to have to load all this information. So, a caching service creates a static version of your post to speed up load time for visitors. Some blogs use caching plugins like WP Super Cache to get the job done, and other times the caching service is built into the host. For example, I host this blog with WPEngine which doesn't allow 3rd party caching plugins because it's got its own proprietary system. And my other recommended website host Siteground has a similar (but different) internal proprietary caching system. Your caching process will differ depending on your host, theme, and other factors – but in a nutshell it's smart to utilize a caching service to speed up your WordPress website.
There are plenty more things you can do to have a fast loading website, and each item on that list can get very comprehensive in regards to how to accomplish them. In general you want to shoot for less than 2-3 second page load times – although we're all guilty at times of not hitting that metric. If your website takes longer than 6 seconds to load, it's definitely a problem to look into.
#6) Properly describing your images with ALT tags
ALT tags are the words that appear in lieu of an image when it cannot be displayed. It's also what is read aloud for blind people who are browsing the web. This is not a place for keyword stuffing or putting your long Pinterest descriptions. Read what Google says about ALT tags for more information about that.

If you're a travel blogger who writes posts that are primarily filled with images from your trips, then utilizing the alt tag for your images is going to be extremely important to your post's SEO. Without properly defining your alt tags, Google has no way of knowing what information the photo contains. However, don't take this opportunity to try and game the system. As Google says, “Filling alt attributes with keywords (“keyword stuffing”) results in a negative user experience, and may cause your site to be perceived as spam. Instead, focus on creating useful, information-rich content that uses keywords appropriately and in context.”
#7) Using proper HTML hierarchy within your posts
The second-to-last thing I want to touch on, which I consider a fundamental aspect of SEO, is utilizing proper HTML hierarchy on all your pages. Typically you only want to use one H1 on each post/page which is reserved for your Page Title. Then you want to divide your post content into H2 and H3 sections.
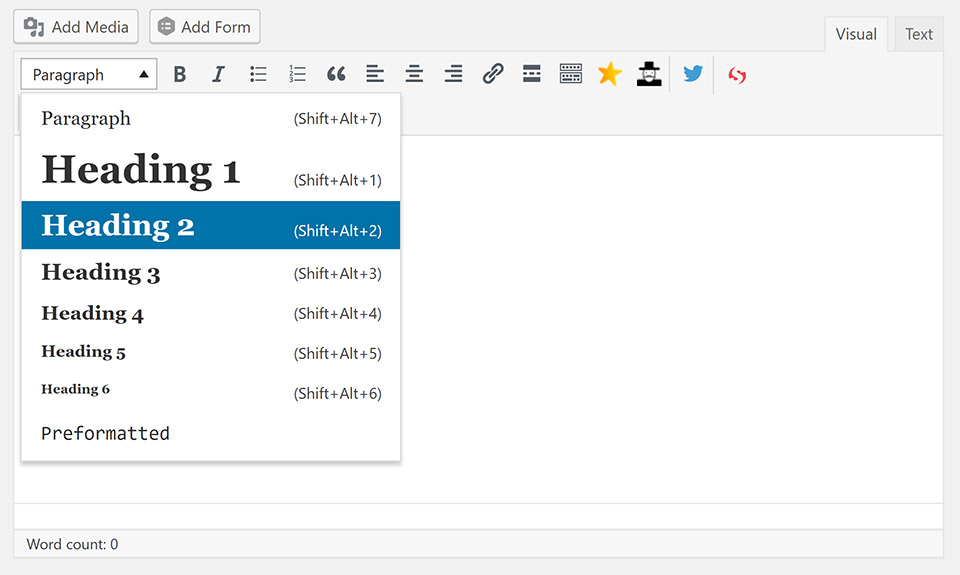
I see many bloggers incorrectly using multiple H1 tags within their posts and not using H2 and H3 tags properly. For example, they'll create section headers by making things bold and increasing the font size. You don't have to be an expert with HTML, but the better you become at properly tagging your post content, the easier it will be for Google to determine your section headers and what the most important content is within the post.
#8) Forget about your Domain Authority (DA) score.
I'm throwing this in here because I'm part of a few blogger groups on Facebook where people are OBSESSED with their DA score. And I'm going to tell you with confidence that it just doesn't matter. The goal is traffic, right? And this goal is partially accomplished by ranking high on Google, right? So where then, in that equation, does DA come into play? It doesn't.
I've got a 5-figure site with a DA score of “7” that ranks first page first result for almost every one of my desired keywords – often times appearing twice on the first page of Google for two different posts. And I've got other sites with DA scores 5-10x that and they don't make nearly as much money or rank as well for my desired keywords because they're in a much more competitive space.
Remember that MOZ is a search engine optimization company with products to sell you – so of course they want you to live, breathe, and obsess over your DA score – but don't. For most practical purposes, it's a worthless metric and I rarely check mine. Traffic matters. Revenue matters. DA does not. (PS: I'm not saying that MOZ products ar worthless, just that obsessing over their proprietary SEO metric is a non-factor in reaching your SEO goals.)
How To Reach More Visitors On Google With The Same Blog Post
Now that you understand the fundamental aspects of sitewide SEO which I have outlined above, it's time to get into specific post strategies. As you'll see, these strategies depend on the foundation you've set above, which is why I had to go over that information first.
#1) Including multiple variations of search queries in your posts
The most basic version of optimizing a blog post for search is to choose a post title that's most similar to how someone might search for the information – and that is unfortunately where most bloggers end their SEO journey for individual posts. It's a good start and very important – but ending things here means you're missing out on other keyword opportunities.
There are four major elements per blog post that carry the most SEO weight which are:
- Post Title – the title that readers see when they land on the page.
- Meta Title – what Google sees as the title of the page and also what appears in the Tab of your browser.
- Slug – what comes after the “.com” or “.org” in the URL of each post.
- Meta Description – the short description of your page that is displayed as the snippet underneath your post title in Google search results.
Most people will use the exact same verbiage for their Post Title, Meta Title, and Slug – but I'm here to show you that you don't have to. And that by doing so, you're missing out on potential keyword variations that people are using to search.
Let's use this blog post that you're on right now as an example:
Post Title: Advanced SEO For Travel Blogs
I want to keep this title descriptive, but also short and sweet since it's appearing within my blog feed on my website. However, keeping it short and sweet is sometimes at odds with including all the search keywords that I'd like. No worries though, I'll use a different Meta Title.
Meta Title: SEO Guide For Travel Blogs: How To Rank First Place On Google
As you can see, the title that I want Google to showcase is a bit longer and also includes one of my favorite search terms “How To”. Not only do I want this title to be descriptive and include relevant keywords, I also want it to be attractive and enticing to Googlers so that they choose my link as opposed to whatever else shows up above and below it. For example, as much as you might want to keyword stuff your Meta Title and create something like “Travel Blog SEO, Search Engine Optimization For Travel Bloggers, How To Rank Travel Blogs on Google” – that's not very concise and isn't structured well in terms of reading naturally – so it wouldn't make for the best meta title.
Slug: https://travelislife.org/travel-blog-seo-strategies/
And as you can see in my slug, instead of making it “.org/advanced-seo-for-travel-blogs” or “.org/seo-for-travel-blogs-how-to-optimize-your-posts-for-search-engines” (which is way too long), I chose a different short and concise slug that reverses the order of the keywords in my post title and also includes the new search term “strategies”. Make sense? Google already sees my Post Title and my Meta Title, so while I need to keep my slug relevant, I don't need to repeat the other titles word for word in the slug. Instead I can choose a relevant slug that puts my keywords in a different order or includes new ones that I haven't included in my Post or Meta Titles.
Meta Description: Learn how to rank your travel blog on the first page on Google and other search engines with these advanced search engine optimization strategies. This SEO tutorial will teach you how to reach more visitors and drive more traffic with the same blog post.
You might notice that meta description is longer than the typical 160 character limit that myself and other SEO experts have recommended in the past. This is because Google is now experimenting with displaying meta descriptions up to 320 characters in length, and sometimes longer. While I will always value a concise meta description over a keyword stuffed longer one, I am starting to experiment with lengthier descriptions, as long as they don't get too wordy.
You'll also notice that I've included a few new keywords in the meta description such as “rank your travel blog” and “search engine optimization strategies”. I don't want to over-do it with shoving as many keywords as possible into my description so I've only included a few new ones. Instead of keyword over-stuffing, my goal is to make my description as enticing to the visitor as possible so that they'll want to click through to get to my content. I also want to be sure to only promise exactly what the visitor can expect on the page so that they don't click through and leave immediately – which negatively affects my bounce rate.
Facebook Title: Ready To Rank Your Travel Blog on the 1st page of Google?
Here's a bonus for you that doesn't directly affect your SEO but can affect your click through rate on social media – which in turn increases the popularity of the post and shares. Deep within the options of my Yoast SEO Plugin is the ability to customize the title and description that appear on Facebook when someone shares my post. Normally by default, Facebook displays the Meta Title and Meta Description within the link preview – but you also have the ability using Facebook's Open Graph to customize these elements. After all, a title that's attractive on social media and catches someone's attention in a news feed may be different than what catches someone's attention in Google search results.
WOW that's a lot of work for each post!
Yup – you're absolutely right. But if you browse through my website long enough, you'll see that I don't do this for every blog post – only the ones that are most important for bringing in search traffic. Other posts are more geared towards generating traffic via Pinterest or social media so I focus less on optimizing those posts for search and put more time and energy into creating attractive Pin images instead.
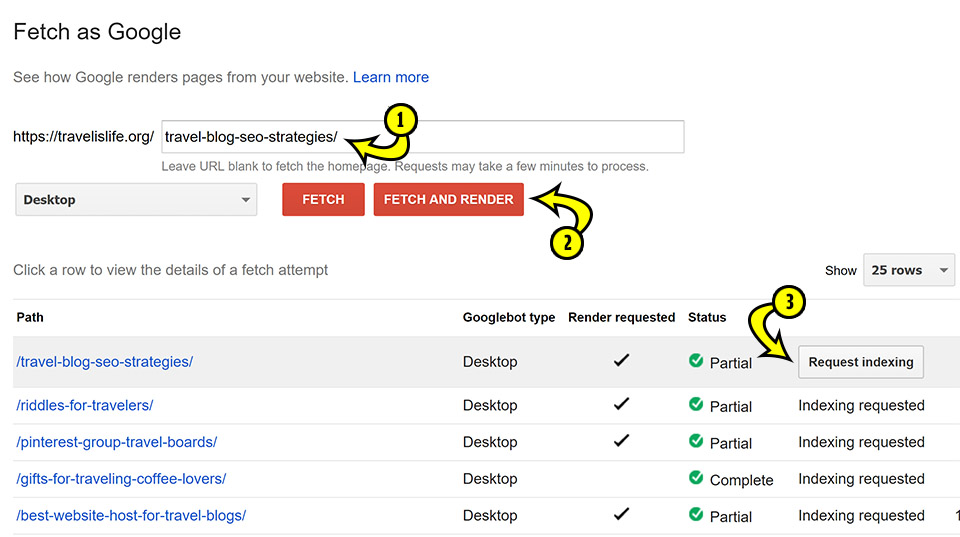
#2) Manually submitting each new post to Google Webmasters
Now that I've optimized the hell out of my post, do you think I'm going to sit around and wait for Google to discover it on their own? The answer is – not hardly! After I publish each new post, I go into my Google Search Console dashboard, click the Crawl tab on the menu, and choose Fetch as Google. Then I copy/paste the post slug into the entry field and click “Fetch and Render” followed by “Request Indexing”. This immediately informs Google of your new post without having to wait for them to crawl your website again. Using these tactics above, I've ranked new posts on the first page / first result of Google in less than 5 minutes after publishing them.
#3) Internally link to your new post from your old blog posts
A buzzword amongst bloggers is “link building” and oftentimes people incorrectly assume that this only refers to “external link building” – and so they waste time over-utilizing tactics like the “skyscraper technique” to harass other website owners like myself into linking to their monetized blog content.
Take it from me… in this past year that Travel is Life has been online, I've received 8,724 e-mails from other website owners asking me to link to their content. They use every trick in the book to get my attention such as subject lines like “Quick question” or “I love your site”, and then they tell me how valuable they think their new content would be for my readers – which is typically some overly monetized, super short, poorly written fluff piece about a topic that barely relates to my readers.
And of those 8,724 e-mails I've received, do you know how many have converted into me linking back to their website? A grand total of ZERO. How's your experience been with link building outreach (on either side)? Similar? And please know that I'm not shy with dishing out links to other people's websites – I do all the time in many of my posts – but only if the links are valuable to my readers about the subject matter I'm tackling. And for me, the discovery of these links has exclusively happened organically and not from someone e-mailing me a slightly customized form letter asking me to link to their resource.
I highly disrespect most link building techniques and think that your time is better spent elsewhere – like in creating more and better content. (Cream rises to the top.) However, the other form of link building which I do highly respect and feel is extremely underutilized in the travel blogging world is “internal link building” which essentially means linking to your new content from previous posts on your site which are already indexed. For example, in this post I've already linked to several other relevant posts in the Travel Blogger Resources category of my website, and after I publish this, I'm going to go back to older resources and link to this one as well.
The part of the link that is highlighted and clickable is called your anchor text. Search engines use anchor text as a reflection of how other people view your page – and by extension, what your page is about. You can't always control how other bloggers link to your website, but you can make sure that the anchor text you use within your own site is useful, descriptive, and relevant.
For example, you'll usually see me link to my own content like this:
Is your travel blog on Pinterest? If so, be sure to check out these 500 travel related Pinterest group boards that you can join today.
That anchor text makes a bigger difference in regards to describing the content it links to, as opposed to doing this:
Is your travel blog on Pinterest? If so, be sure to check out these 500 travel related Pinterest group boards that you can join today.
Get it? Good.
What I love about internally linking to content on my own site is that nothing and no-one is stopping me from doing so immediately after I publish a new post. So in addition to using the anchor text to add to my SEO juice, I'm also leveraging older articles that already have a steady supply of traffic, to refer visitors to my newer posts.
Yes, as you can see at the bottom of this post, I also utilize “Related Posts” at the end of the article, however I find that internally linking to other articles within the post content is more effective than just doing the whole “You might also like…” thing because our eyes tend to gloss over sections like that on websites now-a-days. And in terms of those related posts plugins, all they do is internally link to your posts using the post title – which Google already knows. Instead, internally linking to your own content from old and new posts allows you to be creative with your anchor text and describe your content via additional keywords.
#4) Sharing your content on second-tier social networks
I have profiles on Tumblr, Ello, and Mix. These sites send me very little traffic, but it can't hurt to have my new post URLs listed on various high authority platforms – even if the links themselves are no follow. (However at the time I'm writing this, Mix provides dofollow links.)
This section #4 used to be about Google+ because that was the most important second-tier social network in regards to SEO, but Google retired G+ on April 2, 2019 so it's no longer part of my SEO strategy.
#5) Creating YouTube videos of the content
This is one of my least utilized tactics merely because of the time it takes to do so. However, creating a YouTube video syndicating the same content in a video format – even a short one – can do wonders for your post SEO. And, this might be obvious, but be sure to LINK TO THE BLOG POST in the video description! A small but important detail…
There was a time when I first launched the Travel is Life Tribe (former name of the Travel is Life Creators) that I showed up twice on the same page of Google for the phrase “best travel tailwind tribe” – once for the post and a second time for the short video I made about the post.
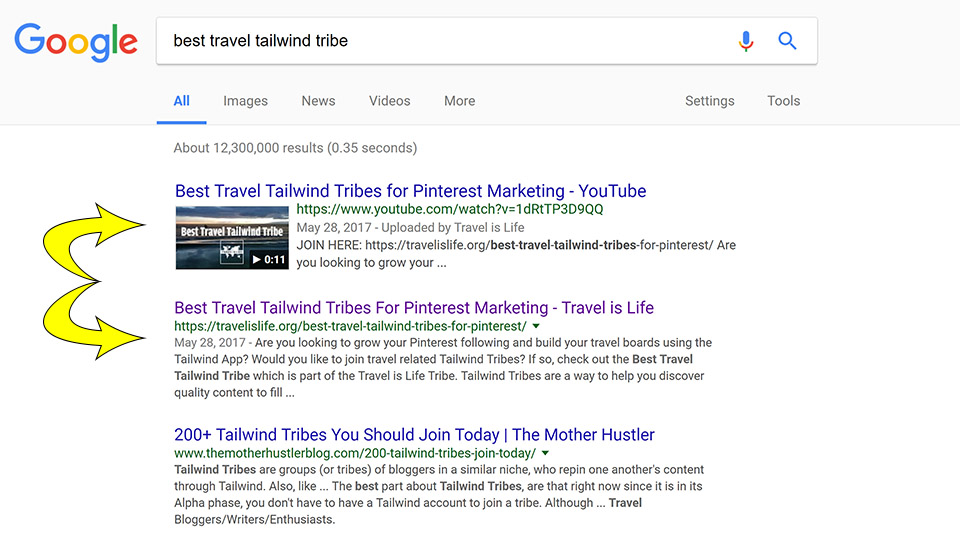
Eight months later, the short video no longer shows up all the time for searches, but at the beginning, it was hot and fresh off the press to YouTube and so the video ranked in search results before the actual post. In my own limited experience with this tactic, I've seen a shorter shelf life for videos appearing within Google searches than posts, but they often get indexed and ranked quicker than the posts, so a shorter shelf life is fine with me.
#6) Updating the date in the post and meta title
Here is a strategy which I recommend that you use sparingly and legitimately. For the most part, I reserve this strategy for my Buyer Guides and specifically for the ones which have a shorter lifespan (often because technology changes so fast). So, for example, when I update my article on Best (And Cheaper) GoPro Camera Alternatives several times a year, I will also freshen up the date of the post and include the more recent date in my meta title.
Keep in mind that when you change the actual post date, two things happen: 1) The post is now top of your blog feed again as if it were just published. 2) The post is syndicated again out to whatever platforms are set to auto-publish such as RSS news feed subscriptions, social media, etc. This isn't necessarily a bad thing, but I wanted to bring it to your attention in case you had reason not to want your e-mail subscribers to automatically receive notification of an old post 4 times a year when you update it.
#7) Featuring Paul Drecksler and TravelisLife.org on your blog
Did you know that featuring my website Travel is Life on your blog gives you an instant 20+ Internet Points which can SKYROCKET your SEO from here to the moon? I'm open to doing written interviews like this one with Toby Richardson from Travelling Minimalist, or I'm happy to appear on your next podcast or vlog episode. Let's talk travel or online business – two of my favorite subjects.
Okay, I'm clearly joking about the SEO benefit, but I do believe that great things happen through collaboration. If you're reading this post, it means that you are serious and dedicated to improving your blog and increasing the reach of your online presence, and that means you're exactly the kind of person I'd love to collaborate with and/or invite to join the Travel is Life Creators – a community of like minded travel bloggers around the world with a desire to grow their online presence while simultaneously helping their fellow community members grow theirs. If that sounds like you then we'd love to have you. Visit that link and check out our community. The application to apply is at the bottom of the page.
📈 Ready to rank your travel blog on the first page of Google?
I hope that this post provided you with some actionable tips and tricks to help increase your blog's search engine ranking. If you found this post helpful, please share it on your social media or to your favorite travel blogger group, link to it in your travel blogger resources section of your website, or share it on Pinterest using my Pinterest friendly graphics below. You should also check out the rest of my Travel Blogger Success Kit for a compilation of resources, courses, and software that I’ve personally curated to help you achieve success with your travel content creation business.
UPDATE: Looking for an SEO keyword research tool to help you find keywords to tackle and track your rank? Check out my new post entitled 7 Best SEO Keyword Research Tools For Travel Bloggers.
If you have any questions or suggestions, drop a comment below and start the conversation. This list of SEO tactics above is not exhaustive and I'd love to know what specific strategies work for you.


Great checklist here, very handy as I’m in the process of updating all my older posts. I can’t for the life of me understand G+ though. If anyone knows of a good tutorial for setting up pages (that isn’t out of date) then please let me know!
Thanks Steph. Regarding Google Plus though, should be pretty cut and dry. Try starting here and going through their setup wizard: https://business.google.com/create
I would love to get rid of the date in my URL. If I change the setting in WordPress will it only change future posts? I don’t want to impact my over 100 posts already published.
Just erased my previous reply – sorry I gave you bad info. Yes it would impact your previous posts, and as you discovered in the previous comment, you’d have to setup 301 redirects for those other posts.
Thanks for the information. I’m really struggling with SEO and I appreciated your easy to follow suggestions.
Great article. I’ve been doing some of this stuff, but some is entirely new to me.
This part struck me as intriguing and I was wondering if you could expound on this idea.
” But if you browse through my website long enough, you’ll see that I don’t do this for every blog post – only the ones that are most important for bringing in search traffic. Other posts are more geared towards generating traffic via Pinterest or social media so I focus less on optimizing those posts for search and put more time and energy into creating attractive Pin images instead.”
I understand that some posts will do better on different platforms, but I never thought about actually creating posts specifically for a platform. What do you consider SEO important posts, and what are you targeting for social media? How do you decide? And what do you do differently?
Thanks for all of these resources. I look forward to going through them all.
Good questions Trina. First let me clarify that I create content for my audience first and foremost. Adding value to their lives is top priority and what guides my content creation. From there, some posts are just naturally geared for Google searches whereas others for social media.
For example, my most recent video about The Pink Sea in Colombia is optimized for SEO. That’s a subject that people are searching for because they’ve seen photos/videos and want to go themselves so they search for info about the destination. You can tell in that article I’ve got H2 tags for search terms like “How To Get To Galerazamba” throughout the post.
Then you’ve got videos like The House That Won’t Die, The 1000 Mile Race, and Say Something – which are great stories in my opinion, but no-one is necessarily searching for them, so I put less emphasis on going the extra mile with SEO optimization.
Don’t get me wrong – I’m an SEO fanatic and every article I publish follows SEO best practices. But I don’t necessarily go the extra mile with external/internal link building, H2 keyword research, or overly keyword oriented titles and descriptions on the articles that aren’t intrinsically searchable..
Hi Paul, I loved the article (and no, I don’t want a free backlink to my content – lol)! I do have a couple of questions.
1. I know where my post title, meta description and slug is and how to edit them. However, where is the meta title and how do I edit that?
2. I use Yoast for SEO. It wants a keyword and then, it wants that keyword on photos, title (at the beginning of the title even), meta description, slug. Isn’t this what Google searches for? You recommend changing this to add other keywords but Yoast won’t like that… lol. But, this is what we should be doing?
3. How do I know if I am registered for Google Search Console or Bing Webmasters. On Google Analytics, I do get info about both of these – google and bing searches. Does this mean I am registered with them?
4. I have been blogging for about 2 1/2 years now. I have a fair number of posts on the first page of google. However, I want to go back and redo my SEO with better keywords on old blog posts. Do you have a recommended strategy for this?
My website is https://gofargrowclose.com/ just in case any of my questions require you to know that.
BTW thank you for such an awesome post. I also love your newsletters. They are nice, direct, and don’t waste anyone’s time. This last one was particularly filled with tons of info that I can’t wait to dig into.
Hey Nicole – Thanks for being a part of our Travel is Life Creators. I’ll try my best to answer your questions below.
1) I know where my post title, meta description and slug is and how to edit them. However, where is the meta title and how do I edit that?
It will be right above the meta description in your Yoast settings. It’s prepopulated with little bubbles, and you have to click on it to edit it. It’ll initially be auto-populated with whatever your post title is. Having to click and erase those bubbles is not very intuitive in my opinion and might be why you’re overlooking it.
2. I use Yoast for SEO. It wants a keyword and then, it wants that keyword on photos, title (at the beginning of the title even), meta description, slug. Isn’t this what Google searches for? You recommend changing this to add other keywords but Yoast won’t like that… lol. But, this is what we should be doing?
Are you referring to Yoast’s “Focus Keyphrase”? If so, fuck Yoast’s focus keyphrase. (I say in the most loving way possible because I love Yoast’s tools in general.) Their tool is just meant to guide you in the right direction. Continue to do your own keyword research via Google and possibly other keyword search tools. That keyphrase feature is just an automated suggestion tool and is helpful, but it isn’t the law. I never use it. I don’t think I’ve ever entered a focus keyphrase on any post. I respect that it’s designed to help, but I trust my own research over an automated tool and so should you. Keep doing what you feel is right in regards to meta titles, descriptions, alt tags, slugs, post titles, etc. You should custom write all those things obviously, and they should be concise, easy/natural to read, and descriptive, but they don’t have to all start with the same keyword. That’s a good practice for very beginners to get into the habit of, but just by reading this post and already having ranked so many posts on Google, you’re well past it. Use it as a guide, but don’t worry if you fail their score.
3. How do I know if I am registered for Google Search Console or Bing Webmasters. On Google Analytics, I do get info about both of these – google and bing searches. Does this mean I am registered with them?
Easiest way to check to see if you’re registered with those services is just to visit each site (Google Search Console / Bing Webmasters), login with your Google and Microsoft accounts (or create one if needed), and see if your site is registered. If not, you can go through the process from there.
4. I have been blogging for about 2 1/2 years now. I have a fair number of posts on the first page of google. However, I want to go back and redo my SEO with better keywords on old blog posts. Do you have a recommended strategy for this?
That can be overwhelming, so perhaps start with your most popular content first, and/or your content that has the most search potential. Some posts of mine, for example, are just not written for search engines. I do the SEO fundamentals of course, but I don’t rack my brains out trying to rank them because they’re more written for social (like many of my videos). You have 84 published posts on your site, perhaps focus on your top 20 to begin with and test the results.
My other recommendation is that while you’re going back optimizing older content, see where you can use inbound links properly, linking old relevant posts back to each other within the post content. And of course, make sure to link to the posts via good descriptive anchor text.
Hope that helps a little!
Great post, snapped it to my bookmarks.
I’m just in the beginning of releasing my travel blog as I am sailing around the world.
Your site is a good resource of quality content!
It is a jungle of information and I have only started to dip my toe into it so far.
Much apreciated, keep up the good work.
Thanks Robin. Pop back in if you run into any questions when optimizing your SEO and I’ll do my best to help. Good luck with with your new blog and your trip around the world!
Hi Paul thanks for the tips this is a great resource to have. I had a question if i change my permalink structure so it took out the date would it ruin any previous links i have up
Hello – Yes it would. You would need to setup 301-redirects for all of your posts before making the switch.
For example if you were previously: https://chalkandcheesetravels.com/2022/02/08/signal-bar-restaurant-clifden-review/
And this was to become: https://chalkandcheesetravels.com/signal-bar-restaurant-clifden-review/
The first URL would no longer work. You will need to make a list of the complete URLs of all your posts and then setup your 301-redirects ahead of time so that you can take them live as soon as you make the switch. It’s easy though. Here’s a list of all your posts: https://chalkandcheesetravels.com/sitemap-1.xml
Copy that list into an Excel Spreadsheet, remove the dates, and import it into whatever you’ll be using for 301-redirects (ie: htaccess, plugin, RegEx, etc — depending on your setup).
The goal is that you do it ahead of time and have them all ready so that you can just click “Enable” to make them all live, and there’s no downtime.